Painting #2: ‘Waste not, want not’ using acrylic skins and collage

Getting back to Painting #2

I started this series of blogs a while ago. In the first blog, I started two different paintings. I continued with both in the second blog. Blogs 3-7 concentrated on painting #1, which I finally completed. I concentrate on painting #2 here, sharing the complete process using acrylic skins and collaging used, dyed, paper towels.

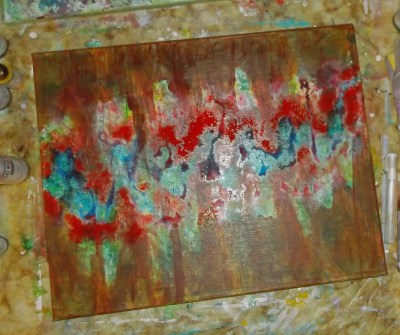
This is where I left off with painting #2 in the second blog.

Painting #1 after step 2 of my acrylic painting technique
Painting #2 after step 2

It’s not pretty at this point, but it gets better, I promise. When I look at this, it reminds me of a garden. So, with that and my ‘waste not, want not’ process in mind, I take the ‘beautiful shade of green’ paper towel from Step 1, which is now dry, and cut out a few dozen leaf shapes in different sizes. I go through my ‘stash’ of similar dried paper towels and find several in different shades of green. I cut out more leaves. Then I take some gloss medium and paste some of the larger ones down on the canvas (#2-3). It already looks better.

waste not want not
#2-3, with leaves pasted down

Using acrylic skins

With my ‘waste not, want not’ process in mind again, I look through my piles of acrylic skins from leftover paint dried on palette papers from previous pieces. I have lots of bright, colorful splotches of dried paint — ideal for making abstract flowers. I don’t worry about making the flowers ‘perfect’ flower shapes. I cut the skins while still on the palette paper. Then I peel them off and paste them down over the leaves. I begin with the larger skins to build up the base (#2-4).

adding acrylic skins
#2-4, adding large acrylic skin flowers

I continue add more flowers and begin to layer smaller ones on top of the larger ones. I also add a few smaller leaves cut from the paper towels. Then add a few dots of different colors to the center of some of the flowers (#2-5).

#2-5
#2-5

It’s beginning to look a lot like a garden of flowers! Another ‘waste not, want not’ idea comes to mind — more leftover dried paint. Not from skins on a palette though. Since I started painting, I’ve been saving the blobs of dried paint that accumulate on the tops of paint tubes and bottles. I find them interesting and many remind me of flower stamens. So I dig out my stash of these paint blobs and paste some of them on the canvas. (In the past, I have also cut these up and mixed them into paint and mediums to add texture to the canvas.) I add a few more dots of paint and more smaller leaves and it’s done! (#2-final).

adding acrylic skins
#2, finished

Not surprisingly, due to the many layers of acrylic skins and dried paint blobs, there is a lot of texture to this piece (#2-detail).

adding adcrylic skins for texture
#2-detail

For Sale in my shop

This painting is now available for purchase in my shop.

‘Waste not, want not’ painting #1, perseverance pays off!!!

Painting #1 — the journey continues

I’ve been blogging for some time now about painting #1 and I’m getting ready to give up on it. But I don’t give up easily and know that perseverance pays off in the end. You can catch up on my progress so far here: #1, #2, #3, #4, #5, #6.

#1-6c
#1-6c


Here’s where I left off (#1-6c). I thought it presentable but not what I was looking or hoping for.


#1-7a
#1-7a


I paint over the acrylic skins in black, white and shades of grey. (#1-7a). When dry, I tape over them so I can complete the next step without worrying about messing them up again.

(You can see my palette here, too, with the paint spread out to dry to make another acrylic skin.)


#1-7b
#1-7b

I paint over the entire canvas in a gradient from pure white to pure black. When thoroughly dry, I remove the tape. (#1-7b). I’m really disappointed, but should have known better. Due to the ridges from the gel, the tape didn’t adhere well and paint seeped underneath it.


#1-7c
#1-7c

Evidently, I don’t give up easily. At first I try to ‘fix’ the paint on the acrylic skins and clean things up, but it’s hopeless. I just mess things up more as the paint spreads past the skins. Rather than try to clean it up, I intentionally go over the skins so the paint seeps out more giving it the effect of ‘bleeding.’ Now at least, the mess is more consistent, LOL! (#1-7c).


Perseverance pays off!!!

I almost like this, but I think it needs some color. So I add some manganese blue, quinacrodone magenta, quinacrodone azo gold, primary yellow and white. I use a few different felt stampers and splatters to add the color randomly … and I think it’s finally done! (#1-finished). Perseverance pays off!!!


Perseverance pays off
#1-finished


This photo is not great, due to the lighting conditions in my dining room.  I will take a better photo and get it up in my shop soon.

What would you have done?

It seems like I went through a lot of unnecessary steps in this process, but it is a process. You never know how something is going to work out until you try it. So I do. I try something different and learn from experience. Looking back, I think maybe I could have done something different. There’s always something different to try. Maybe I should have stopped sooner and left well enough alone? Maybe I should have worked more with one of the ‘steps’ and done something differently? For instance, I look at 5-b and wonder, “What if I just painted the skins a solid color? What if I used fluid acrylics or heavy body instead of the high flow?” What if …? Unfortunately, this is not digital art and I can’t “undo” what’s been done once it’s dry. So, I have no regrets. I learn from experience and move on!

What would you have done?

Available now

I made one more change to this and it is now available for sale. Check it out.

Painting #1, ‘Waste not, want not’ process — learn from experience

Acrylic painting — Learn from experience

I am learning a lot from my experience blogging about my progress in going through my ‘waste not, want not’ technique. For one thing, it might be best to have a finished product before actually beginning to post the blogs. Every time I think that I’ve reached the final step and the painting is ‘finished’, I still don’t like it. To be honest, even as I write this, I’m still unsure. But since I started this, I am going to see it through to the end. Even if the end is gessoeing over the whole thing and starting from scratch.

Painting #1, Step 6

#1, Step 5-c
#1, Step 5-c

This is where I left off in Blog #5 of the process. You can read about from the beginning at #1, #2, #3, #4 and #5. I like it, but it’s still too dark and not enough contrast. This seems to always be my biggest challenge. So I experiment and learn from experience.

I tried several times to add a little white and then some more yellow and light green, but nothing seemed to work just right. So, I decided to take another tack and go with two main colors completely separated — yellow/green and blue. I taped over the acrylic skins and basically had a box with a border. I painted outside the skins in blue and inside the yellow and then added a few streaks of color for interest. Then I painted the acrylic skins in black, white and shades of grey … and came up with another ugly stage (#1-6a) and another one after that (#1-6b) … and a few more that I didn’t capture on camera. I give up on the “box” and go back to the original composition. I finally reach a point that is once again presentable (#1-6c).


learn from experience 1
#1-6a
learn from experience 2
#1-6b
#1-6c
#1-6c

Is it finished?

It’s presentable, but I still am not crazy about it. It’s time to take more drastic measures. I’ll work on it some more and write it up in the next blog.

Painting #1, Step 5 — adding acrylic skins

What are acrylic skins?

I started working on painting #2, because I didn’t know what was missing from Painting #1. In doing so, I realized exactly what it needed — acrylic skins. In simple terms, an acrylic skin is dried paint. Really, that’s all there is to it. Spread acrylic paint or medium in a thin (or thick) layer and let it dry and you have an acrylic skin. The thicker it is the longer it takes to dry. Once dry, the skins are very strong and pliable. They can be cut and used in many different ways. I usually use them as collage elements as I did in Blocks and Blocks 2.

When I am painting, I use a disposable palette paper called Grey Matters Paper Palettes. These are great because when the paint dries on them, it can be peeled off —  creating an acrylic skin! So when I paint, rather than dispose of the palette, I spread the remaining paint out, let it dry and save them (waste not, want not!) Allowing leftover paint to dry into acrylic skins is another way to be an ecofriendly artist. Acrylic paint will stick to itself, so I leave the paint on the palette until I’m ready to use them. I can stack them because the paint won’t stick to the backside of the palette. Here’s a few of my skins dried on the palette paper.

Acrylic skins
Acrylic skins on palette paper

Now you might have already guessed that I use acrylic skins in painting #2. Before I go into the process I used to finish painting #2, let’s finish up painting #1.  You can see the entire process in previous blogs: Step 1, Step 2, Step 3 and Step 4. This is where I left off at the end of step 4.

After sep 4-c pf my acrylic painting technique
Painting #1, after step 4-c.

Painting # 1 of my ‘waste not, want not’ acrylic painting process

In going through my stash of acrylic skins to use in painting #2, I came across a palette that used the same colors I use in painting #1. It was the perfect solution for what was missing … and totally in keeping with my ‘waste not, want not’ process.

I took the acrylic skin and cut it into strips while it was still on the paper. Once it’s peeled off, it will stick to just about anything, including each other. My first thought was to weave them together.  So I glued them all together with some gloss gel on another palette. So I have one piece to work with.

Strips of acrylic skins weaved together

My plan was to place this weave as a focal point. I liked it when I did a rough layout before I weaved them together permanently. But … once I did it, I didn’t like it at all.  So, what now? I’ll save the weave and try to incorporate it into another piece in the future. But what about painting #1, now?

I still had more of the strips left, so I just laid them out in different combinations on the canvas until I found something that I liked. Then glued them in place with gloss gel. After some time, I decide I don’t like the way the white looks so I push it back by running over it with some Hansa Yellow Medium high flow acrylics (step 5-b.) Sorry, I’m not getting great photos here due to all of the high gloss gel and flash.

Adding acrylic skins
Step 5-b


But I still don’t like it. I upload the photo to my photo editing software and look at it in greyscale and see there’s not enough contrast.

Step 5-b in greyscale

So I darken some areas with high flow acrylics diluted with a little water. Then I lighten a few areas, mostly the yellow, by adding a little white to the yellow high flow. It’s better, but still not enough contrast. Especially between the skins and the surrounding areas. I decide to take some white acrylic ink diluted with water and very lightly run the tips of a bristle brush across the skins. It gives them a more detailed stripe and lightens them up significantly. The greyscale looks better, but still not quite there. Now I’ve made it too dark. I’ll work on it some more and also put a coat of satin varnish on it to cut the glare. This will let me get a better picture of it to add to the shop when it’s finished.

Step 5-c in greyscale

Next blog … Painting #1 … finished and for sale!

‘Waste not, want not’ — my acrylic painting technique continues

Step 4 of my acrylic painting technique: ‘Waste not, want not’

This is the fourth in my acrylic painting technique, ‘waste not, want not’ blog series . You can see the progress of this painting from the beginning in Step 1, Step 2 and Step 3.

This where I left off in my last post (step 3-b). The gel is now dry.

Step 3-b of painting #1

Painting #1, step 4

I want something colorful, but a little unexpected. I choose Quinacridone Magenta, Quinacridone Azo Gold and Pthalo Blue. These are my usual ‘go to’ colors. I love the way they work together. Particularly the way they all mix together. To keep it brighter, I also added the Hansa Yellow that I used on the base and Quinacridone Red. To get the ‘unexpected’ look I’m after, I decide to go ‘against the grain’ laid down so far, and paint blocks of color instead (step 4-a).

Step 4-a of my abstract painting technique
Painting #1, step 4-a

So that there are some opaque areas, I lay down a few swaths of white and then add a few more layers of colors (step 4-b).

Step 4-b of my acrylic painting technique
After step 4b

Then I take some titanium white and lightly run it across the top of the ridges left by the gel (step 4-c). This isn’t photographing well under these conditions.

I really like this and was expecting to feel that it was done at this point, but something is ‘missing.’ It needs something more, but don’t know just what … yet. I put this piece on the side and start working on Painting #2 in this process and discover what is missing here.  Step five … coming up in the next blog.

After sep 4-c pf my acrylic painting technique
Painting #1, after step 4-c.

Step 3 of my ‘waste not, want not’ technique (Painting #1)

Waste not, want not

I call this my ‘waste not, want not’ technique, but technically it isn’t really a ‘technique’ as much as a process and/or a way of thinking. It goes hand-in-hand with my ‘ecofriendly artist’ handle. Thinking creatively about the tools and resources I have available to me. What can I reuse/recycle? The ‘starving artist’  in me has a lot to do with it, too. I can’t always afford new canvases, tools and other resources, so I need to think about how I can use what I already have. Why keep (or worse, throw out) a painting that isn’t very good, when I can easily paint or gesso over it and have a ‘new’ canvas? Why put paint on a brush that eventually will need to be cleaned and the brushwater disposed of, when I can use my fingers or something that I was going to throw away anyway, like an expired credit card?

I’m not suggesting that I never use brushes. I do, of course. However, when I do use a brush, I treat the brushwater before disposing it. (More on this in a future blog.) In addition, when I know I’ll be using the same color again soon, I keep my brushes with paint in them in sealed plastic bags. This keeps more paint out of the brushwater and keeps the paint from drying on (and ruining) the brush.

Moving on … Step 3 of Painting #1

At this point I’m covering the two paintings created previously in Step 1 and Step 2 in separate posts.

Painting #1 after step 2 of my acrylic painting technique
Painting #1 after step 2

Here’s #1, after Step 2 and my starting point today.

I look at this and my first thought is, “that’s pretty ugly.” Which is OK. There is almost always an “ugly” stage in abstract painting. Ugly can be transformed by adding more layers. Worst case scenario, it can be gessoed over to begin again. Which I almost did.

Instead, I decided to cover it with Hansa Yellow Light with a little white to make it a bit more opaque. Then I took a plastic comb and scratched into it while still wet. This allows some of that ‘ugly’ layer to filter through and creates a nice base and composition for the next layer.

waste not, want not
Painting #1 after Step 3-a

At first, I was thinking a rainbow. Then I considered doing something monochromatic. Both seemed too easy and I’m looking to experiment and learn from this experience. After giving it some thought, I decided I wanted to add some texture and put a twist on the composition. So, I took some heavy gloss gel and the same comb I used in step #3 and added lines crossing the lines laid down previously.

Step 3-b of painting #1

The gel appears white in the photo, but it dries clear and will leave a 3-D effect on the canvas. More to come in the my next blog.

Go to Step #4.

Step 2 of my acrylic painting technique ‘waste not, want not’

Step 2: Adding the next layers in this acrylic painting technique

Check out the previous post to see how I get to this point on these two paintings using my ‘waste not, want not’ acrylic painting technique.

#1 after step
Painting #1 after step 1
#2 after the first step of my acrylic painting technique
Painting #2 after step 1
  • I continue to work on these on my dining room table.
  • Starting on Painting #1, I paint over most of the top and bottom with Burnt Sienna. Since it’s transparent, it gives these areas more cohesion and yet I can still see the layers underneath. Did I mention I love layers!?
  • I then drop high flow acrylics in pthalo blue, napthol red light  and titanium white across the center. Spritzing with water helps them flow and mix together.
  • Once again, I have a lot of wet paint on the canvas, so I again lay paper towels on top and sop up a lot of the paint.
  • Then I lay the paint soaked paper towels and lay them on canvas #2, pushing the paint onto the canvas.
  • Taking the wadded up paper towel, I sop up a little more paint from painting #1 and randomly dab it on to painting #2.
  • I lay out the paper towel to dry. I can incorporate it as a collage element in a future piece.

Photos of both at this stage are shown below. I’m not sure where either of these are going but I’ll let them dry and work on them more tomorrow.

Painting #1 after step 2 of my acrylic painting technique
Painting #1 after step 2
Painting #1 after step 2 of my acrylic painting technique
Painting #2 after step 2


Go to Step 3.


One of my acrylic painting techniques, step-by-step

The what, why and how of a painting

I think that most lovers of art (that’s you, right?) are interested in the what, why and how of a painting and the artist. I already shared info about me here. So, I thought I’d share some of the my acrylic painting techniques and processes with you. I don’t have the space or equipment to record video (sorry). I’ll include photos of each step as I create it, so you can see the work in progress.

I experiment with many different acrylic painting techniques and often learn something new in the process. Today, I am working at my dining room table, because I am using fluid acrylics and they run when using them standing at an easel. This is an excellent way of using them and I have in the past. Today, however, I don’t want them dripping so the canvas must lay flat. If I decide I do want them to drip, I can simply tip the canvas.

One of my acrylic painting techniques — ‘waste not, want not’

Working on the table limits the size of the canvas I can use. I don’t have any new small canvases, so I am reusing an old painting. Hence the reason I’m calling this technique, ‘waste not, want not.’  I start with an old 16″ x 20″ painting that I’m not crazy about. (It dried much darker than I wanted it, though I like it otherwise.)

  • To begin, I cover it with a light coat of titanium white. This leaves some of the original painting visible underneath. (I love layers!!!)
  • I then put a heavy layer of medium viscosity white and spread it around in some areas with my fingers. Mostly, across the center with some thick lines reaching to the top and bottom of the canvas. (Why dirty a brush that would need to be cleaned, when fingers work perfectly well — and it’s fun!)
  • Next, I drip high flow acrylics in pthalo blue, pthalo green and hansa yellow medium randomly. I allow them to mix on their own. They aren’t mixing, so I spray it with water, which disperses and mixes the paint. Then I spread it with a palette knife to mix it in places.
  • This leaves a LOT of very wet, liquid paint which I know will take a long time to dry. Being impatient, I lay some paper towels on the surface to soak up most of the fluid paint.
  • Since I don’t want to waste all of this perfectly good paint, I take a second old 16″ x 20″ painting (it’s too ‘busy’) and I cover it with titanium white paint. While it is still wet, I lay the paint soaked paper towel on top of it. Then I push the paint into the white on the canvas.
  • I wad up the paper towel and absorb more wet paint from #1 and dab it in places on #2.
  • I lay out the paper towel to dry and will use it as a collage piece in another piece later. It’s a beautiful shade of green.
  • As #2 dries, I see that I covered up all of the old base painting. I scrape into it in places with a comb, a palette knife and some sandpaper to reveal some of the old painting.
  • The original paintings and the paintings after these first layers dry are shown below.
  • Neither of these are much to look at now. That’s OK because this is just the beginning. They will get better. If they don’t, I can always paint over them again — waste not, want not.
  • I will continue to work on these and post my progress in future posts. Please consider ‘subscribing’ to follow along.
acrylic painting technique before
Canvas #1 before
one of my acrylic painting techniques
#1 after


Canvas #2 before
Canvas #2 before


one of my acrylic painting techniques
#2 after

Go to Step #2.